How to start your own blog in 3 easy steps
Table of Contents
This post may contain affiliate links. As an Amazon Associate we earn from qualifying purchases.
The fact that your visiting The Yum Yum Club means that you have at least a fleeting interest in the blogging world. It may be just a food and wine thing, like The Yum Yum Club, or maybe you’re an avid reader of all blogs. By the way, do you know what the top 5 topics for blogs are? They’re the following:
- Food and Wine
- General Lifestyle
- Personal Finance
- Travel
- Health and Fitness
It’s like the standard magazine shelf at in the old fashioned magazine store!! Yep, blogging is the new glossy magazine world…
Whatever your interest in blogging, have you ever thought about giving it a go yourself? Whether it be just to share some of your own experiences, make a little bit of spare cash, or do it full time and try and make a living out of it? It’s far easier to set up than you think…
Just 3 simple steps and you’re up and running:

1. Decide on your name and register the domain
The crazy thing is I think this is the hardest part of setting up a blog! It took my wife and me forever, and a few, shall we say, disagreements, before we came up with “The Yum Yum Club”. But we got there.
Of course, you can think up your name on your own or brainstorm with your family or pals. Whichever method you end up using, and whatever name you come up with, you then need to do a couple of tasks.
a) First thing is to check whether the name is taken
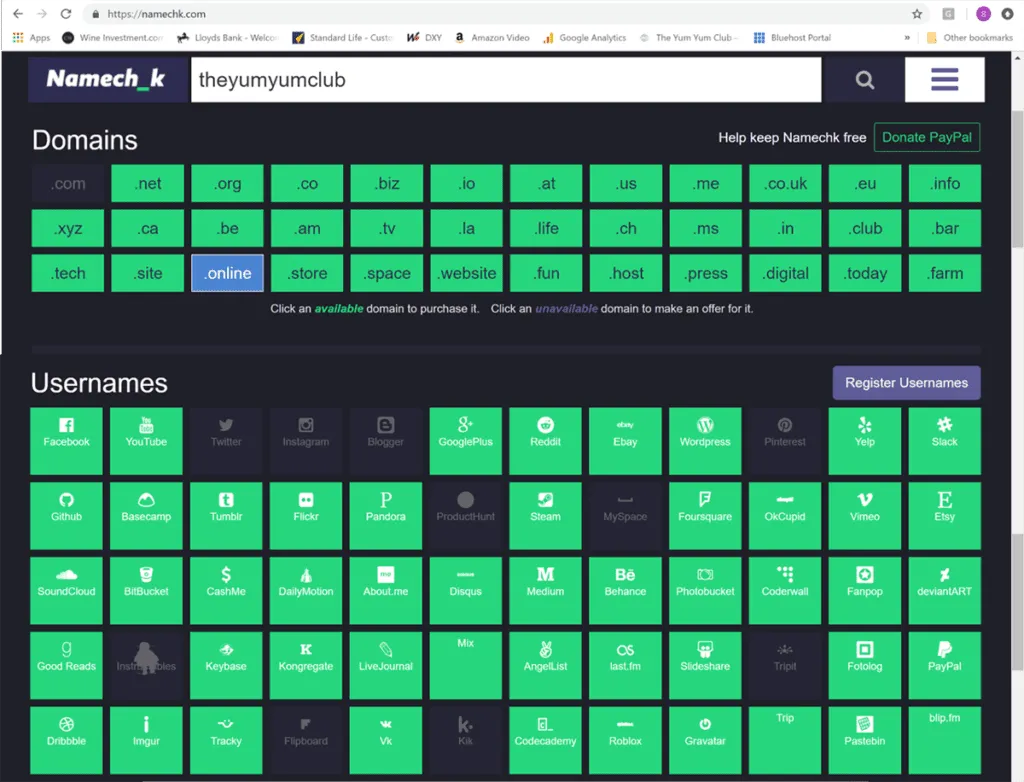
This task is not only to check if the domain name is taken but also if the name is taken on the bulk of the standard social media sites. It’s not the end of the world if the domain is available but it’s taken in just one social media avenue, say Facebook. But you don’t want it taken in most as you’ll end up with many variations of your name on many different sites, and this hinders searches. You’re looking for consistency of message. Remember, you’ll be using these social media sites to drive traffic to your blog.
The best way to check your name is to use a name check site. I use www.namechk.com/ simply because I like the graphics. Just type in your preferred name and it will check domains and social media availability in an instant.
b) Register and set up you Host
The next thing to do is set up the web host, that is, the company who’s server on which you blog will sit and be utilized from. I, and by far the majority of bloggers I encounter use Bluehost. You can access them by either clicking the link or clicking on the banner on the right of this page.
Once there simply click the Get Started Now button and select a plan. As a newbie blogger, so to speak, I highly recommend taking the basic option. You will have to pay upfront compared to monthly but it is a lot cheaper in the long run.
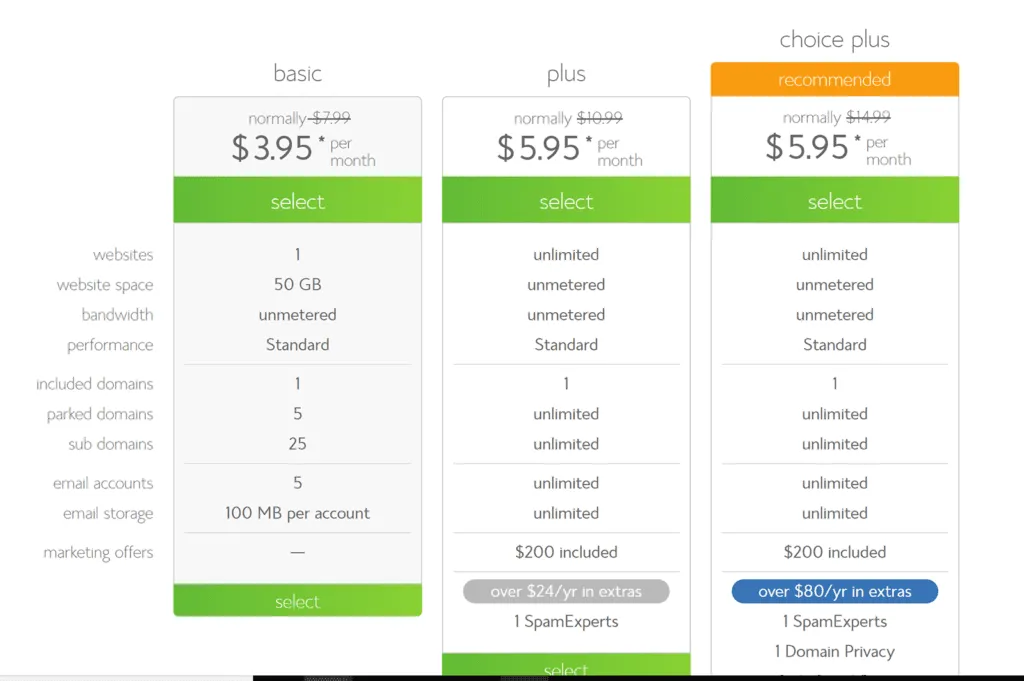
Once you have selected a plan you will go on to register your domain name. There should be no issue with availability here if you’ve followed the name check task above. Note there may be a small charge here for registering your domain name but most of the time Bluehost allows the first name to be registered free.
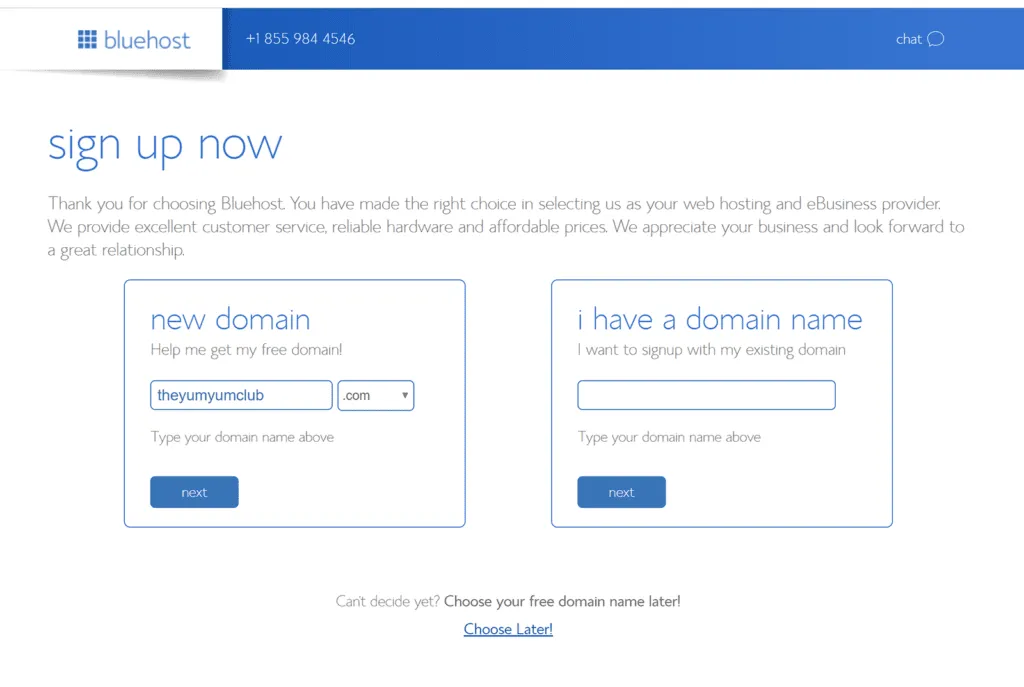
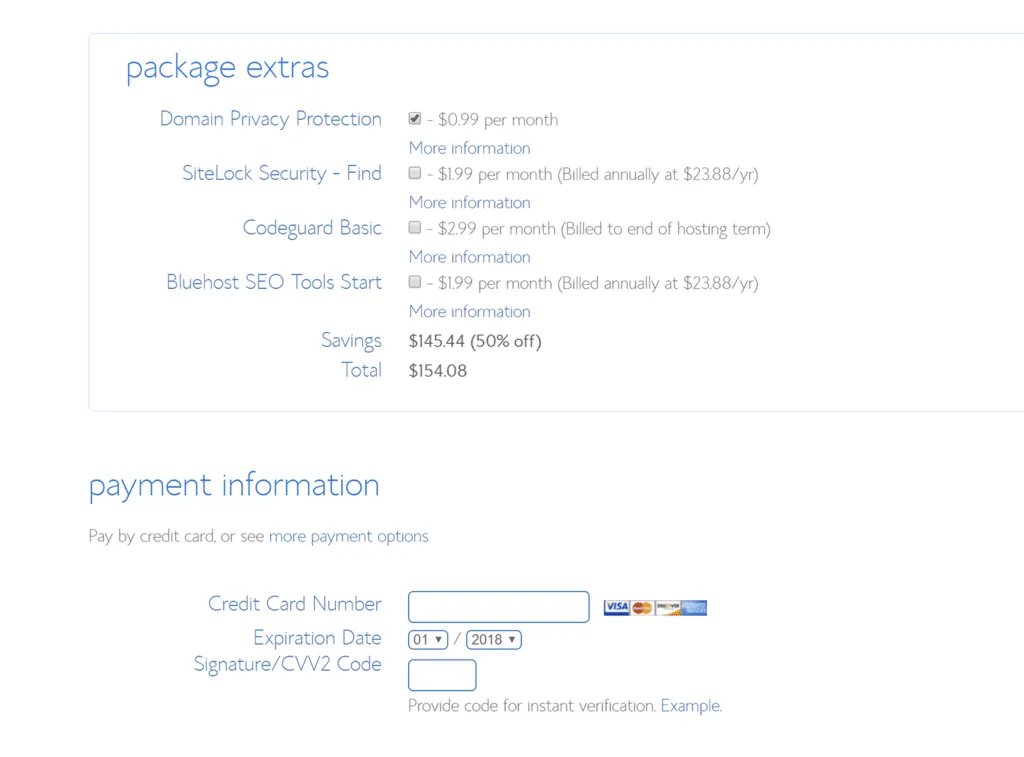
Finally, you’ll come to a setup page where you put your personal details in and, ultimately, pay. There are also some other options for purchase. I recommend the Domain Privacy Protection, which protects your personal details from being displayed. Apart from that, however, I would ignore the rest. You can always add other functionality later once you start getting more advanced with your blogging.
2. Download and install the WordPress.org software
Once registered with Bluehost you will need to download WordPress. WordPress is the blogging software and gives you an initial framework for your blog.
 Login to Bluehost and you’ll see a WordPress logo like the on one the right. Click on it and it will then direct you to a Do It Yourself screen and an option to Install WordPress. Now click this and then add your new domain to where it asks which domain you want to install. Then click that you’ve read the terms and conditions and simple press the Install button. You should soon get a message saying the install is complete.
There now should be a “View Credentials” button on the top right of the screen. Click this and it will show all of your login details, including your URL. Make a note of these. You’ll need this to log in. You can change the details later.
Finally, copy and paste your Admin URL to your browser and a login screen should appear. Use your noted login details to log in and away you go. You have your blog up and running! Congratulations!!
3. Make your blog a pretty and welcoming site to visit
The reality is that by following the 2 steps above you have created a blog. You are part of the blogging world. However, you’ll want to make the public format a little prettier than just a white screen. This is where a “Theme” comes in. A theme is simply a format or template that the blog software, WordPress, uses to allow you to make your site pretty.
There are thousands of free themes out there and you can search the WordPress freebies here.
There are also premium themes where you pay for access or use of the theme. Don’t be fooled by thinking that just because you pay you will get a better theme. This isn’t necessarily the case and some of the free ones are really good.
Just for information, I do actually use a premium theme which is published in the Genesis Framework and is called Foodie Pro by StudioPress. You can check out this format by viewing other pages or posts from theyumyumlcub.com, or scan all StudioPress themes by clicking the link.
That’s about it fellow bloggers and bloggers to be. Just follow these simple instructions and give it a go.
If you have any questions or if there’s anything I can help with just let me know through the comments section below.
As a side note, have a look at how The Yum Yum Club has progressed in its blog over the first 6 months. Check out our monthly business report by clicking here or just click on one of the months below.






Until next time… Steve.


You might also love
More in Kitchen Tips & How-To
The chemistry behind the technique of softening meat with tenderizers
Updated: July 12, 2026This post may contain affiliate links. As an Amazon Associate we earn from qualifying purchases. Softening meat with tenderizers…
Read
Does an Air Fryer have to Preheat?
Updated: July 12, 2026This post may contain affiliate links. As an Amazon Associate we earn from qualifying purchases. This topic has generated…
Read
Healthy Dinner Recipes For Weight Loss
Updated: July 12, 2026This post may contain affiliate links. As an Amazon Associate we earn from qualifying purchases. Introduction Eating a healthy…
Read
Cooking With Wine: Expert Advice on How to Do It Right
Updated: July 12, 2026This post may contain affiliate links. As an Amazon Associate we earn from qualifying purchases. Wine is a versatile…
Read
Garnishing Tips
Updated: July 12, 2026This post may contain affiliate links. As an Amazon Associate we earn from qualifying purchases. With the appropriate presentation,…
Read
How to Plan a Party Menu So Good, People Will Forget the Decorations
Updated: July 12, 2026This post may contain affiliate links. As an Amazon Associate we earn from qualifying purchases. When you’re throwing a…
Read
I dugg some of you post as I thought they were very useful very helpful. https://naturescbdorganics.org/
Many thanks for the comments. It’s easy to set up a blog. Just a little effort needed to get some traffic coming through! Anything I can do to help just let me know.
Sɑved as a favorite, I really like your website! https://dtgbandungonline.blogspot.com/
Many thanks. It’s great to get feedback and all the better if positive! ????
Hello There. I found your blog using msn. This is a very well written article.
I’ll be sure to bookmark it and return to read more of your useful information. Thanks for the
post. I will definitely return. https://www.hickoryfoodfactory.com
Hi there! Many thanks for the comments. If I can help with anything just let me know. Steve…